In Office 2010, users can work more efficiently by adding a custom group on the ribbon. It’s very easy to add some extras to user template between the Quick Access Toolbar and the easy-to-customize ribbon. For example, the Next Page and Previous Page arrows can be easily added on the Acrobat Reader toolbar.
Press F5 to open the Go to dialog or click the Page Number indicator on the status bar. Enter a page number there. The
alternative is the Select Browse Object tool at the bottom of the vertical scroll bar, but the Find and Replace feature usurps it. However, we can add a couple of page jumping options to the Review tab (but you can position the new group on any tab). If it isn’t already too crowded, we can add them to QAT. Unfortunately, both options use the same icon which might just confuse users. That’s why I opted to add a new group to the Review tab as follows:
1. Go to the File tab and choose Options.
2. Select Customize Ribbon in the left pane.
3. In the resulting dialog, click the New Group button. Doing so will add a custom group to the Review tab’s list.
4. With the new custom group selected, click Rename and enter a meaningful name at your will – for instance, Move.
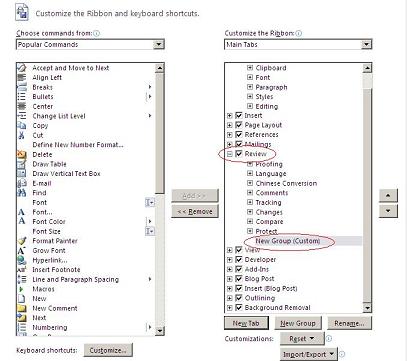
Add-Next-Previouse-Page-1
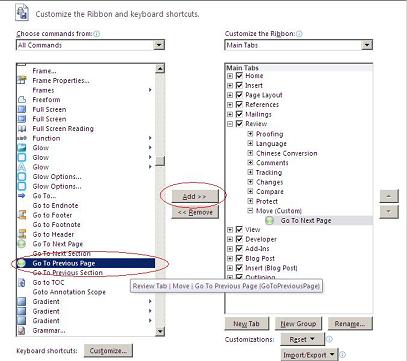
Now, a new group named Move is on the review tab. We can add items to customize the new empty group. In this article, we will add Go To Next Page and Go To Previous Page.
1. Select all commands from the Choose Commands From list.
2. In the resulting list, find Go To Next Page.
3. Select Move in the list to the right and the add the option.
4. Click Add to move Go To Next Page to your new Move group.
5. Find Go To Previous Page and click Add.
6. Click OK.
1. Select all commands from the Choose Commands From list.
2. In the resulting list, find Go To Next Page.
3. Select Move in the list to the right and the add the option.
4. Click Add to move Go To Next Page to your new Move group.
5. Find Go To Previous Page and click Add.
6. Click OK.
Add-Next-Previous-Page-2
Now, go to the Review tab and we will find the 2 buttons are in the new group named Moved.
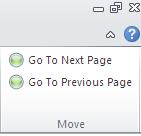
Add-Next-Previous-Page-3
It’s very easy to customize the Office ribbons. We can corral the commands we use a lot into one group or we can designate groups with a specific purpose. Customize group on the Office 2010 ribbon now!

 RSS Feed